
Maps are essential tools for visualizing information, organizing locations, and enhancing user experiences in various fields, from business to travel and education. Whether you need to create map for personal use or professional purposes, digital mapping platforms provide powerful solutions. One such tool, Mapme, makes it easy to design interactive and visually appealing maps without requiring technical expertise.
In this guide, we’ll explore how to create a map, highlight its benefits, and provide step-by-step instructions for building a custom map that suits your needs.
Key Concepts in Mapping
Before diving into the process, it’s important to understand a few key terms:
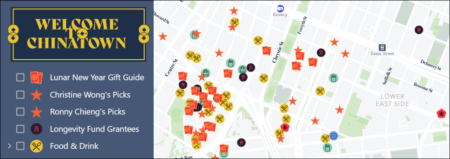
- Markers: Points on a map representing specific locations.
- Layers or Categories: Grouping markers based on types, such as restaurants, landmarks, or service areas.
- Media Integration: Enhancing map locations with images, videos, or PDFs for additional context.
- Data Importing: Uploading CSV files or linking Google Sheets for efficient map creation.
Using platforms like Mapme, users can create highly interactive maps with advanced customization, making it easier to display and organize location-based data effectively.
Benefits of Creating a Custom Map
Creating a custom map offers numerous advantages, including:
- Improved Organization: Helps businesses, event planners, and educators visualize data spatially.
- Enhanced Engagement: Interactive maps make it easier for users to explore locations and access relevant information.
- Easy Updates: Digital maps can be modified in real time to reflect the latest changes.
- Better Data Management: Platforms like Mapme support CSV imports and multi-level categorization, simplifying the mapping process.
How to Create a Map: Step-by-Step
Step 1: Define Your Purpose
Determine why you need to create a map—whether for business planning, tourism, event coordination, or educational use. Identifying your objective helps in designing a functional and efficient map.
Step 2: Choose a Mapping Tool
Select a user-friendly platform like Mapme, which allows for drag-and-drop customization, media integration, and advanced filtering without requiring coding skills.
Step 3: Gather Your Data
Compile location details, including addresses, descriptions, and media. If handling multiple locations, using a structured spreadsheet (CSV or Google Sheets) can help streamline the process.
Step 4: Add Locations and Markers
Plot your locations on the map, using distinct markers and categories to keep information organized. Mapme allows you to apply multi-level categorization and filtering for enhanced usability.
Step 5: Enhance with Media
Make your custom map more engaging by adding images, videos, or PDFs to each location. This feature is particularly useful for tourism guides, business directories, and interactive educational tools.
Step 6: Customize the Design
Adjust color schemes, marker styles, and layout to fit your branding or personal preference. With Mapme, you can fine-tune visual elements to ensure clarity and aesthetic appeal.
Step 7: Share and Embed
Once your map is complete, share it with your audience by embedding it on your website or distributing the link through social media. Mapme supports easy embedding and sharing for wider accessibility.
Best Practices for Custom Maps
- Keep the design intuitive and user-friendly.
- Use categories to organize locations effectively.
- Incorporate relevant media for better engagement.
- Regularly update the map to ensure accuracy.
Conclusion
Creating a custom map is a powerful way to visualize and manage location-based information. By using an intuitive mapping tool like Mapme, you can design interactive and engaging maps tailored to your needs. Whether you’re mapping business locations, event venues, or travel destinations, following these steps will help you build a functional and visually appealing map. Start today and bring your ideas to life with a well-structured digital map!